Online Training On SharePoint
                      

Sunday 31 January 2010

Creating Auto Suggest Query Suggestion in FAST Search for SharePoint 2010

With SharePoint 2010 user gets query suggestions when they type search queries in the Search Text box (Available both with SharePoint and FAST Search). These query suggestions are automatically created over a period of time for any query that has a specified number of results clikcthroughts.
If we want we can manually create the Query Suggestion. In this post I will show you how to create the Query Suggestion for the FAST Search. The Query Suggestions needs to be created using PowerShell. First we need get the Query SSA for FAST Search by using the following command:

$SearchApp = Get-SPEnterpriseSearchServiceApplication
(Add the FAST Query SSA as a parameter.)

Now to add a query suggestion, use the following command:
New-SPEnterpriseSearchLanguageResourcePhrase -SearchApplication $SearchApp -Language En-Us -Type QuerySuggestionAlwaysSuggest -Name "Query Suggestion Name"

These suggestions are compiled by the "Prepare Query Suggestions" job in Central Administration. This job is scheduled to run once in a day. If we need to see these suggestions immediately we need to run this job. Either this can be done using Central Administration UI or using the following PowerShell command:
Start-SPTimerJob -Identity "Prepare Query Suggestions"

I have put two suggestion with SharePoint 2010 and Sheet. Once we start typing Sh these will start appearing:


If we need to remove a query suggestion we can use the following command:
Remove-SPEnterpriseSearchLanguageResourcePhrase -SearchApplication $SearchApp -Language En-Us -Type QuerySuggestionAlwaysSuggest -Identity "Suggestion Name"

To display all the query suggestions we can use the following command:
Get-SPEnterpriseSearchQuerySuggestionCandidates -SearchApplication $SearchApp

Also if a user does not want to see these query suggestion they can be stopped from Preferences and then unchecking the box showing the search suggestion:

Wednesday 27 January 2010

Saving Web Part with SharePoint Designer 2010

With SharePoint 2010 ability to save a Web Part is introduced. We can save a Web Part using SharePoint Designer 2010. This saved web part will have all the setting and the content specified and it can be used in the same site collection multiple times. This is very helpful if there are certain web parts which are getting reused in multiple places. Users do not need to configure them again and again insted of that a Web Part can be created with all these properties and which can be used multiple times.
So Now I will show how to achieve this. I will save a Content Editor Web Part which is showing the data from a text file which is available in one document liberary. Here are the steps for doing this:
1. Go to SharePoint Designer 2010 and inser a Content Editor Web Part.
2. Select the Web Part and go to Web Part Tools and Format. There we have two options to Save the Web Part.


If we save the Web Part in the Site Gallery this will save the web part in the Web Part Gallery else we can save this web part into a file which can be uploaded later to another gallery. I will select the Site Gallery Option.
3. This will prompt a dialog box where we can specify the name for this Web Part and the description. Also we can set the propery for this Web Part.


4. I have uploaded a text file in one of the document libraries and I will point my content editor web part to this text file using this Set Propertied button:


5. Once this is done we are ready to use this saved Content Editort Web Part into any page. This Saved Web part will be available under miscellaneous Category.


 6. Once we place this web part it will show the text from the text file it was pointing to. If we change the content of the text file automatically Web Part content will also be refreshed.


This concepts is very helpful in the scenario where we want to create our own data view web parts based on some list or document library data. We can create a Web Part like this and save that web part. While doing this, there is yet another prompt saying:


If we select No, the Web Part will show data from the list at the path validation, relative to the site in which it is used. So we can use this web part in any site having a list called Validation. With this this saved Data View Web Part can be resued in multiple environments.

Saturday 23 January 2010

Error while using FAST Search site with SharePoint 2010

I installed FAST Search for SharePoint 2010 and then created a site based on FAST Search Template. While running the query on this site a error came saying "The Search Request was unable to connect to the Search Service".


When we install FAST search for SharePoint two Services Applications are created one for Content and one for Query. To resolve this issue we need to associate the FAST Query SSA with the Web Application in which this site collection is created. This need to be done from Central Administration:


Once this is done you can use FAST Search and it will return the results using FAST Query SSA.

Friday 22 January 2010

WCF Service error while executing PowerShell commands in FAST Search Server

I was trying to execute some PowerShell commands from the FAST Search for SharePoint powershell and it was throwing a exception like “Failed to communicate with the WCF service”. On further investigation I found that to execute some commands the current logged in account should be part of FASTSearchAdministrators group. This is a windows group which get created once the FAST search is installed on the server. So if you need to run commands like Set-FASTSearchMetadataManagedProperty which helps to configure the Managed Metadata properties for FAST you need to make sure that current log in account is part of this group.

Wednesday 20 January 2010

Creating Additional Refiners in Refiner Web Part in SharePoint 2010

In SharePoint 2010 a new Refiner Web Part is introduced which is shown along the search results. This Web Part is available for both SharePoint 2010 and with FAST Search for SharePoint 2010. With this Web Part user can easily filter the search restults based on the metadata associated with the results. Any Managed Properties in SharePoint can be added as a refiner category. I will be adding a new refiner category in the Refiner Web Part using FAST Search for SharePoint 2010.

For this first we will be creating a Managed Property. I have already created a site column which I will be using as Crawled Property while creating the the Managed Property. To create Managed Property go to Central Administration and then go to the FAST Query SSA in the Manage Service Application. Inside the FAST Query SSA find the FAST Search Administration:


Now inside this click on the Managed Property Link:


Now here we will be creating a managed property. Click on the New Managed Property and a new form will be open. Specify the Managed Property name and type of data which it will be mapped to. In the Mapping to Crawled Property field click on the Add Property button. This will show all the crawled properties. Since I have created a SharePoint Site Column I will select the Category as SharePoint. My site column name was LivingLocation so I will get the Crawled Property name ows_LivingLocation. Make sure that crawling is done after creating the site column. Only then it will appear here.


Once this is done there are we need to make sure to check the refiner propery check box.


Now the Managed Property is ready and it can be added as a refiner category. A managed property can also be enabled to work as a refiner by using this PowerShell command:
Set-FASTSearchMetadataManagedProperty –Name LivingLocation -RefinementEnabled $true

Now we need to add the LivingLocation as the refiner property. To do this we need to edit the XML in Filter Category Definition in the Refiner Web Part.
<Category    Title="Living Location"  Description="Location" Type="Microsoft.Office.Server.Search.WebControls.ManagedPropertyFilterGenerator" MetadataThreshold="1" NumberOfFiltersToDisplay="4" MaxNumberOfFilters="20" ShowMoreLink="True" MappedProperty="LivingLocation" MoreLinkText="show more" LessLinkText="show fewer" ShowCounts="Count" />
If the field type is managed metadata field we need to have the type as Microsoft.Office.Server.Search.WebControls.TaxonomyFilterGenerator

Once we add this XMLstring we need to make sure to change few more things in the Web Part. We need to uncheck the Use Default Configuration else the web part will not take the modified XML string.


Also we need to make sure that the number of Categories are configured properly. Refinement Panel only shows the specified number of categories which are mentioned in this field.

Saturday 16 January 2010

Working with SharePoint 2010 Document Sets using SharePoint Object Model

In SharePoint 2010 we can create Document Sets in a Document Library. Learn more about Document Set @ Document Sets in Sharepoint and Customizing the Document Set

A DocSet is basically an SPListItem which is actually a folder. To work with Document Sets we need to add the reference for the following Namespaces:
  • Microsoft.Office
  • Microsoft.Office.DocumentManagement
  • Microsoft.Office.DocumentManagement.DocumentSets
These dlls are available inside C:\Program Files\Common Files\Microsoft Shared\Web Server Extensions\14\ISAPI\
Now we will get all the documents sets in a document library using SharePoint Object Model. We will check each item in the document library to verify if it is a Document Set & if it is a document set we will get its property. We will find the Welcome Page URL, the name of the each document set, items inside a Document Set, and the fields shown in the Document Set Welcome Page.
using System; 
using System.Collections.Generic; 
using System.Linq; 
using System.Text; 
using Microsoft.Office; 
using Microsoft.Office.DocumentManagement; 
using Microsoft.Office.DocumentManagement.DocumentSets; 
using Microsoft.SharePoint; 
using Microsoft.SharePoint.Portal; 
using Microsoft.SharePoint.Administration; 

namespace GettingDocSetsWithObjectModel 
{ 
    class DocSetDetails 
    { 
        static void Main(string[] args) 
        { 
             if (SPFarm.Local != null) 
                { 
                    SPSite oSiteColl = new SPSite("http://SiteCollectionURL"); 
                    SPWeb oWeb = oSiteColl.OpenWeb(); 
                    SPFolder oFolder = oWeb.Folders["http://SiteCollectionURL/DocLibrary"]; 
                    SPDocumentLibrary oDocLib = oFolder.DocumentLibrary; 
                    foreach (SPListItem oItem in oDocLib.Items) 
                    { 
                        if (oItem.Folder != null) 
                        { 
                            DocumentSet oDocSet = DocumentSet.GetDocumentSet(oItem.Folder); 
                            if (oDocSet != null) 
                            { 
                                SPListItem oSpItem = oDocSet.Item; 
                                //This will get the Document Set Name 
                Console.WriteLine("Docset Name: {0}", oSpItem["Name"].ToString()); 
                //This will get the detail who has created the Document Set. 
                                Console.WriteLine("Created By: {0}", oSpItem["Created By"].ToString()); 
                                //This will show the Document Set Welcome Page. 
                Console.WriteLine("WelcomePageUrl: {0}", oDocSet.WelcomePageUrl); 
                                //This will show the number of items in the document set. 
                Console.WriteLine("ItemCount: {0}", oDocSet.Folder.ItemCount); 
                                //This will show the fields which are getting displayed in the Welcome page. 
                Console.WriteLine("Welcomepage Fields:"); 
                                DocumentSetTemplate template = oDocSet.ContentTypeTemplate; 
                                WelcomePageFieldCollection fields = template.WelcomePageFields; 
                                foreach (SPField field in fields) 
                                { 
                                    Console.WriteLine("{0}", field.Title); 

                                } 
                                Console.Read(); 
                            } } } } } } }

Thursday 7 January 2010

Difference between Solution and Feature in SharePoint

Many time people ask me a question what is the difference between a Feature and a Solution. Both are used to deploy some additional functionality or assets to SharePoint then what really Solution compares with Feature. In my view, Solutions are a better way to deploy features and it provides certain capabilities which are not there with the if we deploy using Feature. Let me summarize the capabilities of Solutions (essentially which are WSP files) and the feature:
  1. The Solution can be used as a vechicle to deploy the features.
  2. If you need to deploy the feature in a multi server Farm having multiple WFE (Web Front End Servers), it needs to be done separately in each WFE server. If we are updating a DLL in GAC then this needs to be done separately in each WFE. Also there will be a time when with this the feature is deployed in one WFE but not in another one. So deploying customization using feature become tedious if you have multiple servers. Thats where Solution provides the answer. Once we install the Solution it updated the settings in the Config DB and then it become available to all the WFE which are part of the Farm. Once we deploy the solution the feature will be available in all the WFE's.
  3. The another limitation deploying with features is that we can not deploy the DLL in Global Assembly Cache. But this can be achieved using the Solutions. This become quite significant if we have many WFE and we are trying to update a DLL. The work gets multiplied because of doing this in each server and the chance of mistake increases.
  4. If we need to do some changes in the Web.Config files it is not possible using the Feature. Again if we are using the Solutions this limitation can be overcome.
So Solutions are much better in many aspects and it gives much flexibility but with added complexity and extra work required to create it.

You may also want to read the and understand the various aspect of Farm Solutions, Sandboxed Solutions & Apps for SharePoint. Read @ http://manish-sharepoint.blogspot.co.uk/2013/04/farm-solutions-sandboxed-solution-and.html

Creating Custom Actions using SharePoint Designer 2010

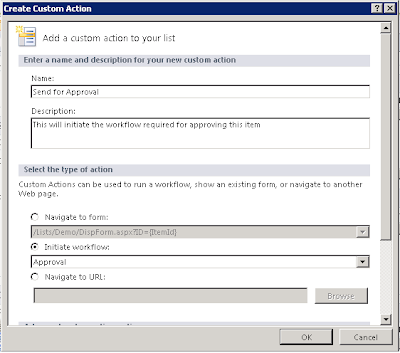
Using SharePoint Designer 2010 we can add custom actions to our list and document library. These custom action can appear in the menu which appears when we right click each individual item or in the ribbon. These custom action can navigate to a form for the list, Initiate a workflow which is associated to the library or can navigate to a new URL.
With SharePoint 2007 if the user needs to initiate a workflow they need to go the workflow page and and then do the same. With Custom Actions this can be simplified a lot. So with this post I will try to explain how to create a custom action using SharePoint Designer 2010 to initiate a workflow.
I have created a list and added a OOB Approval workflow to it. Now we need to open the list in the SharePoint 2010. On the list setting dashboard there is a section for the custom actions or we can do it from the ribbon for the list menu.

I have put the name for the Action as "Send For Approval". Also the Initiate Workflow will show all the associated workflows on the list. Select the workflow which we need to trigger with the custom action. Just say OK and we are done. Lets see how this custom action looks like:


The Action has come in the menu. Now we will try some more advanced option to change the location and associate a icon with this.

Just we need to specify a sequence number and an icon file in these options. Now see how it looks like:


Doing this was not so easy in SharePoint 2007. We need to do this using feature and XML files which was complicated process.
We can also add menu items in the ribbon in the forms for adding New Item, editing item and viewing item using the same concepts.

Now we will add a button in the ribbon when we see the details for the list item. We will add a button which will print the list item. To do this select

Select Display Form Ribbon and fill the details like the below.


Now if we open a list item for viewing we will see a addtional button appearing on the ribbon for print as below:

Saturday 2 January 2010

Applying SharePoint Themes using SharePoint Object Model

I had a requirment where I need to get all the available themes and apply or remove a themes in SharePoint using SharePoint Object Model. Here is the code which helps to do this:
// To get all available themes using SharePoint Object Model
            using (SPSite site = new SPSite("http://localhost"))
            {
                using (SPWeb web = site.OpenWeb())
                {
                    ReadOnlyCollection<ThmxTheme> themes = ThmxTheme.GetManagedThemes(site);
                    foreach (ThmxTheme theme in themes)
                    {
                        Console.Write("Theme Name: {0}\nServer Relative Url: {1}\n\n", theme.Name, theme.ServerRelativeUrl);
                    }
                }
            }

            // To apply a theme to a SharePoint Web using SharePoint Object Model
            using (SPSite site = new SPSite("http://localhost"))
            {
                using (SPWeb web = site.OpenWeb())
                {
                    ThmxTheme theme = ThmxTheme.Open(site, "/_catalogs/theme/Viewpoint.thmx");
                    theme.ApplyTo(web, false);
                    try
                    {
                        web.Update();
                        Console.Write("\nUpdated web with theme: {0}", theme.Name);
                    }
                    catch (Exception e)
                    {
                        Console.Write("Error: {0}\nStack Trace: {1}\n\n", e.Message, e.StackTrace);
                    }
                }
            }

            //  To remove a theme to a SharePoint Web using SharePoint Object Model
            using (SPSite site = new SPSite("http://localhost"))
            {
                using (SPWeb web = site.OpenWeb())
                {
                    try
                    {
                        ThmxTheme.RemoveThemeFromWeb(web, false);
                        web.Update();
                        Console.Write("\nRemoved theme from SPWeb");
                    }
                    catch (Exception e)
                    {
                        Console.Write("\nError: {0}\nStack Trace: {1}\n", e.Message, e.StackTrace);
                    }                    
                }
            }
If you like this blog please visit the sponsors from SharePointAds.com @
Related Posts with Thumbnails